Especially if you're a new subscriber to Be A Better Cook, you might be wondering what those last two articles were about. Ironically, after last week's newsletter about making mistakes, they were.....mistakes.
What you saw about Chicago Style Pizza and Smoked Turkey were the shorthand notes that I take for most anything I cook. I post these notes to a different blog, called "What Tom Cooked", which can be found at http://www.whattomcooked.blogspot.com/.
I use that blog as essentially a recipe box. Almost all the dishes I cook get entered there, unless it's recipe I've made before. Mostly, it's so I can either have the full recipe at my fingertips, or at least have a shortcut to remind me where it came from. For example, which issue of Cook's Illustrated had the pizza recipe? I don't buy the indices that Cook's sells, so I need a better system.
About those two.....the pizza was great. Cook's used an approach in which the dough is made with the same technique as for fresh puff pastry dough. Multiple rises, layers of butter folded in. Delicious. The other notes refer to my own choices of product and proportion. Central Market is a high end grocer in Houston. Their bulk Italian sausage is just about as good as from the local Italian markets in Chicago. Unfortunately it's an hour drive from my house.
Smoked Turkey. Who knew? I bought an extra frozen turkey at holiday sale prices last winter, and kept in the garage fridge til now. Tropical Storm Alex is now in the gulf, so my timing to reduce the freezer stock a little bit last week was good. But once I had a thawed turkey on a 100 degree heat index weekend, I wasn't so sure what I'd do with it.
So I cut the turkey into 6 parts, and flavored half with barbecue flavors, the other half with Herbs de Provence, to be a little closer to "traditional" turkey flavors. I added some fresh herbs and garlic to the second half.
Smoking was done over charcoal and soaked wood chips for about 60 minutes or so. 160 degrees temperature in the leg joints. With resting time, everything was cooked well.
I like it it, it was easy, and that much turkey lasts a long time for a family of 5. The surprise to me was that my 15 year old daughter has been eating smoked turkey sandwiches for lunch AND dinner for days now, and wants smoked turkey this Thanksgiving.
So.....at the expense of a little confusion, you get a few random extra cooking comments this week, and a little insight into how I cook on a regular basis.
Cooking advice for any level cook
Smoked Turkey
Whole smoked tukey, cut into 6 parts.
3 parts - 1-2 T Williams Sonoma Herbs de Provence + garlic, oil, S & P
3 parts - commerical BBQ dry rub, garlic, oil. Mix in same bowl after above, added a little extra leftover herbs.
Smoked 60-70 minutes. 160+ in joints and most of breast, which reached temp while resting.
3 parts - 1-2 T Williams Sonoma Herbs de Provence + garlic, oil, S & P
3 parts - commerical BBQ dry rub, garlic, oil. Mix in same bowl after above, added a little extra leftover herbs.
Smoked 60-70 minutes. 160+ in joints and most of breast, which reached temp while resting.
Chicago Sytle Pizza on Father's Day
Recipe from Cook's Illustrated - Issue 102, Jan/Feb 2010
Bulk sausage from Central Market
- One pizza made with mild
- One made with hot
Sauce from the Batali recipe (thyme/carrot)
Mid-scale mozzarella - brand = Precious (I think)
Asiago - 10% of total cheese - mid-scale brand.
Cheese on TOP of sausage, instead as middle layer.
Unbelievable. Best homemade ever, better than most restaurant versions in Chicago.
Grilled Pork Loin Stuffed with Homemade Sausage
This is a great recipe, with just one tricky step – tying the roast. Instead of making the sausage stuffing you could just use bulk sausage and add sautéed onion and fennel.

| Grilled Pork Roast a la Porchetta A 4-5 pound pork loin, butterflied. The meat counter can do this for you. 3 tablespoons olive oil 1 fennel bulb, white part only, chopped medium. Finely chop soft green fronds to make ½ cup. 1 large onion, chopped medium --- Sauté onion and fennel in oil over medium heat until soft, about 8 minutes 2 pounds ground pork 2 tablespoons fennel seeds 2 tablespoons fresh rosemary, chopped finely 6 garlic cloves, sliced 1 to 2 tablespoons ground black pepper 1 tablespoon kosher salt ½ cup fennel fronds --- Add all ingredients and sauté until pork loses pink color. Remove from heat and let cool.
You might want to place a few quarters of red onion or yellow peppers on the grill while the meat cooks, along with a foil packet of potatoes with olive oil, S&P and a few whole garlic cloves (skin on). As the pork rests for about 10 minutes, throw some zucchini slices on the grill for two minutes (turn heat back up to high). |
| To butterfly and tie a roast: Learn the technique here |
Just One Little Problem
Earlier this week I made just one little mistake on a recipe I've made before. Sure it was edible, the flavors robust, but it just wasn't cooked right. This experience reminds us that just one misstep can greatly affect the outcome of a recipe:
- One missing ingredient
- One poorly conceived substitution of an ingredient
- One missed or misunderstood cooking step
- In my case, it was one gas grill burner left on low, instead of turned off
So I ended up with a grilled, stuffed pork roast that was a kind of dry on the outside, a little more charred in one place than browned, and just barely cooked enough on the inside. Not a dish I'd want to be served at a restaurant, or to serve to anyone but my closest friends. They could tolerate the letdown. The family made do.

| Grilled Pork Roast a la Porchetta If you've read this newsletter for a while you might remember "A Tale of Two Pork Roasts", in which a simple sausage stuffed pork loin from Mario Batali was more flavorful and moist than a somewhat sophisticated recipe that used Mortadella and Provolone. Even 4 star reviews on epicurious.com were misleading, showing how internet searches for recipes are often less reliable than a few very high quality cookbooks or magazines. This week we found a 4-5 pound pork loin in our freezer and wanted to use it before we get deeper into Hurricane season (gotta keep the freezer a little sparse this time of year). So I decided to make the Batali pork roast, but grill it instead of heating up the kitchen. Sounds simple enough. The stuffing is a mixture of ground pork, fresh fennel, onion, fennel seeds, garlic, fresh rosemary and lots of black pepper. Combining these ingredients actually results in a homemade sausage – and you get to control the flavors. This time I decided to grind up two pounds of whole pork shoulder in the food processor instead of using store-bought ground pork. I thought it might make a better sausage and it did. To transfer this recipe from the oven to the grill, I planned to get the grill good and hot (about15 minutes on high), then use indirect heat. On a gas grill, turn off the middle burner and set the other two to their lowest setting. On charcoal, pile all the coals on one side of the grill. Because the grill is so hot at first, you'll get a nice char, then after 10 minutes, turn the roast over and let it cook amidst the indirect heat for up to an hour. You want to see 135 degrees on an instant read thermometer placed into the center. You might want to place a few quarters for red onion or yellow peppers on the grill while the meat cooks, along with a foil packet of potatoes with olive oil, S&P and a few whole garlic cloves (skin on). As the pork rests for about 10 minutes, throw some zucchini slices on the grill for two minutes (turn heat back up to high). The full recipe will be in the next post. |
| Oh…..and Another Little Problem Margie and I had already decided that this week's newsletter would be called "Just One Little Problem". But there's more. After we ate this delicious but slightly dry pork we were watching a couple episodes of Gordon Ramsey's Hell's Kitchen. At some point toward the end of the second episode someone said "potato". I leapt to my feet and gasped aloud. Margie says the look on my face was priceless. I realized that I had left two foil packets of potato and garlic on the grill…..for the last two and a half hours. After opening the back door, I wondered what had kept the neighbors from calling the fire department. The smell was awful. The grill was pumping out smoke like a burning oil well. We turned everything off and decided to inspect the damage in the morning. So many good things can come from unexpected developments in our lives.
 |
Why You Want a Chinois, Even If You Don’t Know What It Is

This is a Chinois.
I lived a long time without a Chinois, thinking "a strainer is a strainer". Well, that's just not true. There's a reason a Chinois is an important tool in professional kitchens. It's faster than a traditional strainer, more accurate with fewer drips, and the perforated steel surface is far, far easier to clean up than a mesh strainer. I now can't live without this tool.
Why is it faster and more accurate? I guess it's just a perfect shape and design for the job. On the one hand, it's like an old fashioned metal colander with smaller holes, just cone shaped. But with the addition of a handle and a lip on the opposite side, it's easy to wield. While I have used it for draining a batch of pasta or rinsing rice, it really comes into power when you need to strain something with solids like a sauce. OK, at the moment I can't think of anything to strain with solids that are NOT a sauce, just bear with me.
A few comments Chinois-related:
- You French speakers will recognize Chinois as the word for Chinese. This tool has been called a China Cap or Chinese Hat. In French kitchens it was thus appropriately called a Chinois.
- A medium sized Chinois has a pretty large capacity. Mine is only 7.5" diameter, and it holds….well, I can't tell the capacity, it's got all these little holes in it. Anyway, it holds a bunch, useful for anything I've needed so far. They come much larger and smaller sizes. This medium one is just fine by me.
- The first really big difference to a mesh strainer is that you can press hard onto the sides of the Chinois, but would be stressing and almost tearing apart most strainers.
- Beware – some Chinois use mesh too, you want one that's perforated solid stainless steel.
- Chinois are often used with a pestle, or pressing tool, to further speed up the straining/pressing process. A spatula works well, but I can see how the pestle might work better. I may buy or make one soon.
- Some Chinois are sold with a three legged stand, so it can balance over a bowl. Mine is large enough that I can balance it across two sides of my sink, and then let it drip into a bowl or pot in the sink. I'm fine without one more thing to have to store somewhere, so I'll skip the stand.
A couple of the things I've made lately where the Chinois came in handy are:
Pineapple Soup (dessert) with champagne sorbet
Homemade Chicken Stock
A Cool Soup for A Hot Summer
This is an incredibly easy recipe with a great payoff. The blending and straining is the only thing that takes a little effort, and even that is very simple after you've been through the process once or twice. If you have a stick blender and a chinois (a conical-shaped strainer), then blending and straining becomes faster and easier. But a blender and a regular strainer will always work too. I'll share a few comments about the specialty tools in the next post.
Cool Pea Soup
2 slices bacon, chopped
2 large shallots, chopped
2 tablespoons white wine
1 pound peas, frozen are fine in this recipe!
3 cups chicken stock
1/2 cup heavy cream, plus additional for garnish
Optional: goat cheese, small vegetables for garnish, garlic toasts
Special equipment:
Stick blender or blender
Chinois or large strainer
- Add bacon and shallots to a medium saucepan. Cook over medium high heat until soft. Bacon does not need to get crisp.
- Add white wine and turn heat to high. Boil for 2 minutes.
- Add peas and chicken stock. Bring to a boil, then turn down heat to simmer 15 minutes.
- Remove pan from stove and allow to cool.
- Blend the soup. A stick blender is the easiest tool for this job, since the soup can be blended neatly in the pan. Otherwise, carefully transfer in batches to a blender or food processor.
- Strain soup through a Chinois or larger strainer into a bowl. Press on the solids to release as much liquid as possible. Scrape the outside of the strainer to get the excess into the bowl.
- Taste and season with S & P. Chill 30 minutes.
- Blend in cream and serve or return to chill. Garnish with goat cheese, a drizzle of cream, small vegetables, etc.
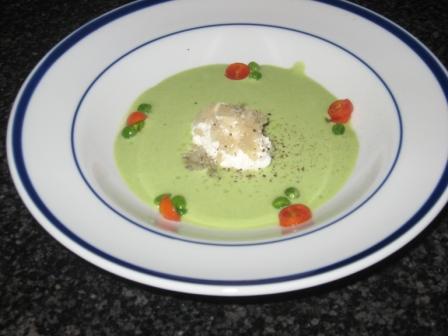
Notes about the picture above: when I made this particular soup for the first time a few months ago, I happened to have on hand some homemade Fromage Blanc - a soft cheese made from buttermilk. It's like goat cheese, but with a very mild flavor. I also had shallot confit - several shallots cooked slowly in oil, with a little garlic and thyme, then strained. The Fromage Blanc and Shallot Confit are what you see as garnishes, along with a couple peas and baby tomatos from our garden.
Grilled Chicken Pasta with Salami and Mozzarella
4 split chicken breasts, bone-in, skin-on, approx 12 oz each
2 tablespoons butter
2 tablespoons olive oil
4 garlic cloves
¼ teaspoon red pepper flakes
¼ pound Italian salami, sliced or whole
¼ pound mozzarella, preferable fresh packed in water
¼ cup basil leaves, chopped finely
1 pound semolina pasta, any shape (Barilla brand recommended)
- Optional: Combine 3 tablespoons kosher salt with one quart water in a large bowl. Stir to dissolve. Add chicken breasts and add more water to cover. Refrigerate for 30 minutes.
- Heat gas grill on high for 20 minutes covered. Or light charcoal until white ash on edges of coals. Mound coals onto one half of the grill and heat the grate thoroughly with cover on.
- Meanwhile, put a large pot of water on high heat for pasta. Dry chicken with paper towels and season with salt and fresh ground pepper.
- Dip wads of paper towel in vegetable oil. Using tongs, wipe towels on grill grate over hottest area to create a non-stick surface.
- Place chicken on hottest part of grill, skin side down. Cook for 3-5 minutes to brown. Shift chicken to alternate position on hot area if flares occur. Turn chicken bone side down and cook for 2 minutes. Move chicken to coolest part of grill (turn off all but one burner on a gas grill). Cover and cook for 25-35 minutes, until thickest part of chicken registers 160 degrees on an instant read thermometer (or juices run clear).
- While chicken is cooking, chop garlic. If salami is sliced, cut slices into strips. If salami is whole, cut into small cubes. Cut mozzarella into cubes.
- Cook pasta per directions. Test it 2 minutes prior to the recommended cooking time. Reserve 2/3 cup cooking water before draining.
- Heat butter and oil in small skillet over medium high heat. Add garlic and pepper flakes, cook for 1 minute, but do not allow it to brown. Turn heat to high. Add salami slices for 30 seconds or cubes for 1 minutes. Remove pan from burner.
- Combine pasta, garlic oil, salami, cheese and basil. Add half of reserved pasta water, stir, then add more water as desired.
- When chicken is cooked, allow to rest for 5 to 10 minutes. Cut chicken from bone and add slices or cubes to pasta and serve.
This seems like a lot of detail. But I'm sharing a very precise grilling method and throwing in a few details on pasta and prepping that many of you can take for granted. This recipe is not as hard as the 10 steps would imply. I estimate a little over an hour start to finish, not all active cooking, plus optional 30 minutes for brining chicken.
A Good Recipe From Cook’s Illlustrated
Yesterday I made a dish the whole family really liked – Grilled Chicken Breasts Stuffed with Salami and Mozzarella. In addition to the meat and cheese, there was a small portion of flavored butter, using garlic and basil. The pickiest eater in my house admitted it was "actually pretty good" and cleaned his plate. That's high praise.

The recipe was kind of published in Cooks Illustrated magazine this month. I say kind of, because they did an article about stuffed chicken breasts. But this version of the recipe was only available online. It actually took a bit of work to be able to find it on their site. Even though the link published in the print magazine was to their home page, you had to poke around on "Current Issue", "Stuffed Chicken" and then the recipe variation. That sounds straight forward, but the chicken recipe is also on their home page, and if you click there you get taken to a "Subscribe here" page.
I'm quite a fan of what Cook's Illustrated publishes, and highly recommend the magazine to any level of home cook. I've been a subscriber since Issue 2 (they're on 105 currently). But they charge for online access even if you are a print subscriber – so I can't search for past recipes, etc. Or they write about the process used for a taste test, but won't show the results unless you're an online subscriber. Believe me, there's no way I'm paying for the same content twice.
Don't get me wrong, I love their magazine and their approach to creating awesome recipes – they challenge accepted techniques and test extensively to get them just right. But I've been pretty cranky lately, so I'm whining about another frustrating visit to their site. I'll get over it.
ANYWAY…..this was a really good recipe for a lot of reasons. Below you'll notice the phrases "multiple kinds of flavor" and "[good] proportion of ingredients". These are two of the most important aspects of higher quality cooking. Most recipes don't achieve either of those goals.
- The cooking technique specifically solves some tricky problems of grilling chicken breasts – dryness, flare-ups, multiple kinds of flavor
- It calls for skin-on, bone-in chicken breasts, one of the most cost-effective ways to buy chicken. The skin is easily removed after cooking if you don't want the calories, but is a fairly important part of the cooking process.
- The proportion of ingredients is very well composed
- They shared a unique way of tying up a chicken breast (not a bad idea for stuffed breasts) – which is the fastest method I've seen ever.
- And the recipe is easily adapted to different stuffing ingredients
- Prosciutto and Fontina, flavored with fresh tarragon
- Black Forest Ham and Gruyere, flavored with thyme and Dijon mustard
- Get your grill really hot (white ash charcoal piled on one side of grill, or gas grill on high 20 minutes)
- Put vegetable oil on paper towels, then using tongs, wipe the grill to create a non-stick surface
- Grill breasts skin side down on hottest part of grill for 3-5 minutes – enough to brown, but not burn
- Turn chicken over and cook on hot portion of grill 2 minutes
- Transfer skin side up to cool portion of grill (turn off 2 burners on a gas grill)
- Cook covered for 25-35 minutes, until thickest part registers 160 degrees on an instant read thermometer
- Using skin-on breasts means that the skin chars up first, not the flesh, and keeps the chicken from drying out
- By using bone-in breasts, the bone at first provides a slight heat barrier, then once warm provides a bit of internal heat retention as the chicken cooks slowly. Oh, and they add more flavor too.
- Butterflying (slicing a pocket) bone-in breasts for stuffing seems easier than with boneless breasts – maybe due to extra stability
As I mentioned earlier, there are lots of good things about this recipe. But I have a hard time recommending a pretty time-consuming recipe that involves brining (I didn't mention that yet, did I?), butterflying and tying up poultry. So I thought I'd use the same ingredients, some of the techniques and make it into a simpler dish, and incorporate it with pasta to create an almost one-dish meal.
The recipe will be published in the next post, which I guess I'll call Pasta with Grilled Chicken, Salami and Mozzarella. Clever, huh?

If you're interested in subscribing to Cook's Illustrated click here (and I'll get a few cents referral fee – yeah!). Some of the other good articles and recipes in their issue this month are:
- Memphis-Style Barbecued Ribs (ironic, huh?)
- Charcoal Grilled Argentine Steak with Chimichurri
- Spinach Salad with Carrot, Orange and Sesame
- Sweet Cherry Pie
- Testing Metal and Plastic Spatulas
- Diced Tomato Taste Test
- Chiles 101 – two pages of useful info on peppers
Quick Homemade Barbeque Sauce

A few weeks ago after I disclosed my inexperience with barbecue ribs I was thrilled to get several excellent suggestions and recipes from the rib cookers out there. Thank you. My neighbor Mike asked to swap rib tips for a homemade barbecue sauce recipe. Sounds like a fair trade.
I hadn't gotten around to digging up recipes for the barbecue sauces I've made in the past, when I found myself needing sauce this past weekend. I'm not entirely thrilled that my wife Margie likes Sweet Baby Ray's sauce from the grocery aisle, but if it keeps her happy, well, we know how marriage works. However, while shopping for our Memorial Day BBQ / Birthday Party for Nora I forgot to pick up a bottle.
Not wanting to go back to the store, especially for store-bought sweet sauce, I created this quick sauce which was a hit with the ten 15 year old girls we were feeding. In fact, they used it both for ribs and as a dipping sauce for deep-fried shark bites. The shark was caught by two of Nora's friends last weekend in the Gulf near Galveston.
As most of you know, I'm normally rigid about using recipes – but this is a good exception to my rule. Once you get the base in place (tomato, vinegar, sugar and a few spices) you can modify it very much to your taste. Here's my version from last weekend. Unlike a bottle of sauce, you'll have bits of chopped shallot (or onion) and garlic in it.
½ cup minced shallot (or regular onion)
4 cloves garlic, chopped
1 tablespoon olive oil
--- Sauté shallot and garlic in oil in a medium sauce pan over moderate heat until softened
2 cups canned whole or crushed tomatoes
½ cup brown sugar
½ cup white wine vinegar
2 tablespoons Worcestershire sauce
1 tablespoon chili powder
Juice of one lemon
Juice of one lemon
1 teaspoons Tabasco sauce (or ½ teaspoon cayenne pepper)
1 tablespoon salt
1 teaspoon fresh ground pepper
½ cup white wine
--- Add tomatoes. If whole, break them apart in the sauce pan with a wooden spoon
--- Raise heat to bring to a boil.
--- Key step: Taste it. If you'd like it sweeter, add more brown sugar. It it's too thick or too spicy, add more wine.
--- Then lower heat and simmer 15 minutes
Homemade Lemonade- A Recipe for People Who REALLY Don't Cook

Below you'll find a recipe that even Michael5000 can create with confidence and attain successful results every time - Homemade Lemonade.
Two things come to mind as I share this recipe:
- Why bother making lemonade from scratch?
- Do you even need a recipe?
A recipe? Why not just squeeze some lemons, then add enough sugar and water until it tastes good? Well, you can do that. But, if you have a recipe in hand with good proportions of lemon juice, sugar and water, then great results are easier and faster to achieve.
There are two key factors in this simple little recipe. Superfine sugar will dissolve more quickly and thoroughly than regular sugar (note - superfine is not confectioners sugar). Second, be sure to use water that's been filtered or bottled. I do that for most cooking where taste matters, for example cooking rice, which absorbs the water.
Notice that both the recipe itself and the superfine sugar help make this a fast process.
Homemade Lemonade
2 cups fresh lemon juice (from approximately 8 lemons)
1-1/4 cups superfine sugar
6 cups water (filtered or bottled)
Ice
1. Squeeze lemons over a measuring cup, using a strainer to catch seeds and pulp. Pour into serving pitcher.
2. Stir in 1-1/4 cups sugar and water. Taste, and add additional sugar if desired.
3. Serve over ice in individual glasses (resist the temptation to fill the pitcher with ice).
"I'll be with you in a squeezing of a lemon."
- Oliver Goldsmith, She Stoops to Conquer, Act 1, Scene 2, 1773
Subscribe to:
Posts (Atom)